Wednesday 30 November 2011

Scene changes

After analysing are setting location, we discovered a 'pit' in the room. Originally used by mechanics to work on the cars from underneath, we thought it would be a perfect idea for our film. We would have the killer located inside the pit and emerge from it. He will then kill our victim before returning to the pit. It had a 'scary' vibe and look to it. It was a perfect article for our slasher.


Monday 28 November 2011

Weathering Chair

After looking at the previous pictures of the chair, we have decided that it needs to be made to look more rustic and old. It looks to out of place againts the other furniture in the room, as it has a nice 'glossy' effect to it and the other furniture has old and weathered appearances.
To make the chair the victim shall sit on look old, I sawed into the sides to give it a 'damaged' and 'worn' look. I also singed the edges with a blow torch to give a 'faded' look.I then sanded it down so it was safe for the actor to sit on.

Before:

After:


Sunday 27 November 2011

Bruise Make Up

This is some of the bruise make up we have tested on three different models. We needed to make sure that the make up would look effective under the camera so have made sure that the colours are dark and bold to withstand the lighting as well. We have used different types of eye make up to give the effect of bruising around the eye. We will use this make up to make our male vitcim look as though he has been beaten up slightly. The next step is to look into sourcing or finding blood.


Friday 25 November 2011

Storyboards 2

We have made a few changes to our storyboards and have uploaded the changes. We have changed number 1 and 16. We have also added number 17 were the title of the film will be shown.

Fake Wounds.

To get the effect of our victim being wounded, we have had to research how to create fake wounds. One of the ways do create an open wound via this recipe:
  1. Use a toothpick to mix 3-4 drops of red food coloring into a dollop of petroleum jelly.
  2. Stir in enough cocoa (a pinch or so) to darken the red color to a deeper, blood-like tint.
  3. Separate the toilet roll into the two layers and tear out a small rectangle (3x2 inches) from a single layer of the paper.
  4. Place the tissue at the place of the wound and cover it with the petroleum jelly mixture.
  5. Mold the tissue into a wound shape, with the edges raised higher than the center of the wound.
  6. Add some petroleum jelly mixture to the center of the wound.
  7. Sprinkle cocoa at the edges of the wound to darken it. Add cocoa to the wound center if a scabby (as opposed to fresh) appearance is desired.
The photo above is a first attempt. To improve it we will change the shape of the the cut, darken the mixture to a more blood like colour and also change the thickness. This cut will be on his face so needs to look realistic as it will be one of the main focuses of the camera.


Fake black eye with a fake bloody nose
When making the fake cut we experimented with making a bloody nose. Instead of using fake blood, we decided to use a more simple technique of red lipstick and and red lipgloss, It works quite well, however we will still try to make improvements again on areas such as the colour and shape of the blood trail to make it more realistic. 

Thursday 24 November 2011

Blood special Effects

To create an atmosphere evil, violence and to show that the room is torture room, I have made fake blood and painted them onto certain furniture in our setting. This hints to the audience that 'murder' has taken place before and is likely to happen again.

I used different amount of red spray paint, water and acrylic to create a liquid that would stay on the surfaces.

I flicked the fake blood on the chair the victim would be sitting on, representing a chair of 'death' in a certain way. I also placed blood on the head of a hammer to show that this was a murder weapon and it may be used again. I am pleased with how the 'blood' set to the surfaces but I was not 100% satisfied with how geniune it looked.


Wednesday 23 November 2011

Possible Actor Expressions


Shock/fear - this type of expression would be an excellent emotion for our victim to portary when he sees the killer


After discussing this photo we decided that a sad sort of expression is not really relevant for our film opening narrative


This kind of posture and distortion of the body is ideal for the death scene


This expression is the kind we want to see during the death scene for example when he gets stabbed


This is a good example of the sort of expression we want our victim to convey when he is watching himself get killed and is almost waiting for it to happen. Another point at which this expression would be good is when he realises the time on the CCTV footage.

CCTV Effect

EffectsPortal website, How to do the CCTV Effect

Example of CCTV effect used in Brutal Justice trailor
Quick Steps
1. Import Footage
2. Make an adjustment layer and apply a tint
3. Add a ‘Posterize time’ effect and change frame rate to about 4
4. Add noise and make amount about 8%
5. Add a time code and position it
6. Use text tool to create the name of camera and use the rectangle tool to make a background for the text.
7. Create a new composition with fractal noise and insert in to main composition
 
Improvements
  • Shoot from more angles to make new shots to add to final composition
  • Instead of using video, you can use images to apply the effect, which is much easier
  • Add more intermittent flickers

Storyboards:


Tuesday 22 November 2011

T.V

A lot of what is on our film opening will be what someone is viewing on a TV screen so I will research which TV set would be appropriate for genre ,purpose, and compliment appropriate mise en scene and the setting.

This is a picture of a television from a horror film called  'A Clockwork orange'.
Despite being made in 1971 it is intended to look fairly modern and futristic . there appears to be a head going into the TV and this is impossible. Since this is not possible it links to our film opening and its supernatural aspects as our televison tells the future.


This is a picture of a televison screen from a horror film called 'The Ring'.

It was filmed in 2002 at this time people were buying DVD's at this time but many still using VHS this shows that there was a chance they could have used a more modern TV but chose to use a more older looking one instead. this could be because of the connotations with old things and old things in horry movies. Horror movies usually associate old things with scary things such asa old houses being haunted. his is an example of a TV that is quite "normal" and these sort of TVs can be found in most houses across the world, this is an idea used across horror movies of creating fear out of everyday objects, however using an older TV would give the audience the impression that the TV itself has something special or supernaturaul about it. The screen is blank which could reperesent a malfunction or to create more focus on whats happening. This is another reason why we are intending to use an old television.


To help decide which type of tv set to use in our film opening we will compare modern and older televisons and evaluate them to work out which type would be more effective for us to use.


We have chosen to use an older style TV as our research has shown it will be more inriguing and create more suspense since it could evoke the idea it has a history behind it.
 Televison Static


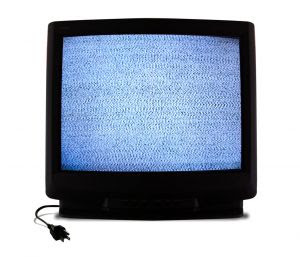
Static can often create an uneasy feeling since it has many connotations and is often used in many horror movies for dramatic effect. An example of this is a film called "White Noise"  ( http://www.imdb.com/video/screenplay/vi1308426521/  )  static is shown on TV screen at some poinnt in the movie when the dead contact the living via "white noise". It symbolises interference in many ways for example spiritual interfence and electrical interference. The sound created by static can also help add to the tense,suspensful atmosphere desired. ( http://www.soundjay.com/tv-static-sound-effect.html  )

Sunday 20 November 2011

Lighting Testing

We have experimented with different styles of lighting that we could use in our opening clip. I have taken a number of pictures of a saw from the same angle, positioned where the opening will be be set. I have use different lighting angles and colour filters to produce the effect we want. We want a blue, dull light to portray an atmosphere of stress that the murderer will cause the victims and the mental and spiritual nightmares they are faced with.

I used three different bulbs, each with different shades of blues and different angles to create different effects. As we could not easily get any light filters or gels in the desired colours, I used spray paint and coloured in the various bulbs. I also used cut outs of blue shopping bags to create the blue effect.


Nuetral, No effect, plain yelow light bulb.

More concentrated light, white LED light

Dark blue Shopping bag covered light

Dark blue/green lightbulb painted with acrylic


High Angle white light

Blue sprayed white bulb, high Contrast

Friday 18 November 2011

Costume


This is what our male victim will be wearing. We have decided by looking at our research that plain clothes are the best as they do not detract from from the action or detail of the scene. Our victim will being wearing a plain white vest top, something similar to the one shown above, to allow the contrast of dirt and blood to be shown more vividly. White generally has connotations of innocence and purity which could show the characteristics of our victim. However, we have chosen to dress our victim in grey jogging bottoms as they show a more murkier side of his personaltiy, it's not white to show innocence and its not black to show complete darkness. It add mystery to the character. The jogging bottoms will be similar to the ones shown above.The clothes are very casual to show how this can happen to anyone and allow the audience to relate to the victim.